Recently, a customer wanted to allow its users to select specific alternate SMTP addresses for removal via the FIM portal.
We considered extending the schema to add several attributes to each user to hold the alternate smtp addresses and a corresponding flag to indicate a removal request, but as each user could have dozens of alternate addresses, the solution would not scale well.
When using the checkbox or radio button controls out of the box in FIM, there are two options for populating the available values in these lists. One is to code it in the RCDC, which works if there is a set of values that would apply globally to all users. With email addresses, this wouldn’t work. The other option is to create a new resource type to allow the management of those values. Adding a resource type of “secondary smtp” would have greatly increased the size of the metaverse and sync times. It seemed like using a sledgehammer to tap in a loose floorboard nail.
So, we used dusted off our SharePoint developer skills and created a custom feature.
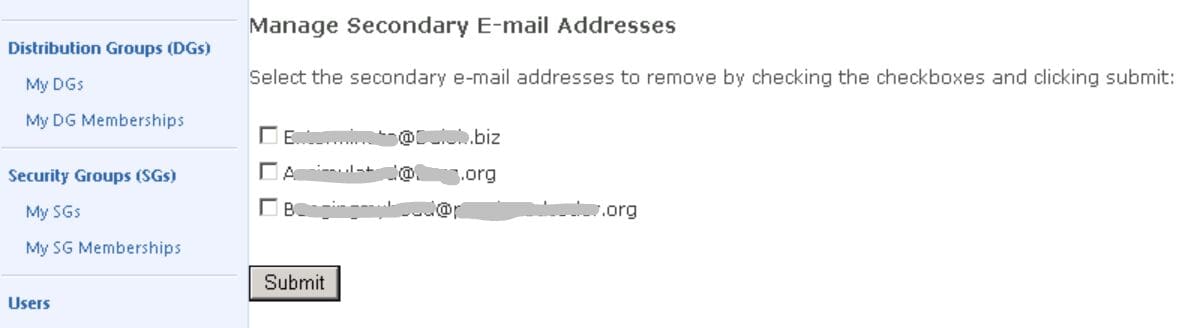
The result is a page that looks like it is part of the FIM portal, but is really using the aspx checkbox control and values stored in an indexed string. We simply added a link to the page on the user’s RCDC:

The proxy address collection is written from AD to the FIM Service via the FIM Sync to an Indexed String multi-valued attribute. The custom feature reads though these values and presents the user a checkbox list of options. Unselecting an item and submitting updates the proxy address collection attribute so that it can flow back to AD.
[It should be noted this feature is on a SharePoint page and is not part of the RCDC.]
We used the ILM2 master page to make the checkbox list have the look and feel of the FIM Portal. Then, we hosted a page the feature deployed on a library on the portal’s SharePoint site.
The tricky part was granting the code access to the SharePoint object model to keep the user’s existing session and not have to prompt for re-authentication. A quick and dirty way to do this is to just set the site’s trust level to full, but that is a security risk. Doing that would grant full trust to all assemblies on the server. Another quick approach is to install the assembly in the GAC. This grants it full trust across all applications on the server—which is obviously a wider range of permissions than it needs.
The solution was to customize the code access security with a custom policy file. This file lets us grant a specific trust level for our assembly alone. The permission is granted to the code and not the user running the code.
First, we copied the wss_minimal.config file in the CONFIG file of the 14-hive and named it wss_custom.config.
It was then modified it as described below:
Using the Visual Studio command prompt, we extracted the Public Key Blob to a text file. After navigating to the directory that had our .snk file for our assembly we ran these commands:
Sn –p MyFileName.snk PKOnly.snk
Sn –tp PKOnly.snk > PKOnly.txt
The resulting text file had a very long value after the phrase “Public key is” to copy.
We then copied that value to a new section in the wss_custom file:
<CodeGroup class=”UnionCodeGroup” version=”1″ PermissionSetName=”FullTrust”>
<IMembershipCondition class=”StrongNameMembershipCondition” version=”1″ PublicKeyBlob=”[Paste the really long value here]”></IMembershipCondition>
</CodeGroup>
Here’s a screenshot:

In the web.config file, we added this to the <securityPolicy> settings:
<trustLevel name=”WSS_Custom” policyFile=”C:\Program Files\Common Files\Microsoft Shared\Web Server Extensions\14\config\wss_custom.config” />
Next, we changed the trust level in the web.config file to WSS_Custom.
<trust level=”WSS_Custom” originUrl=”” />